Thursday, October 30, 2014

My Favorite Tableau Trick For Work: MIN(1)

Many of us found +Tableau Software from the work that we do in our day jobs, and have since taken our passions to our free time.  When given the ability to build visualizations we're passionate about, people come up with creative solutions like Anya A'Hearn's Stairs Of The CityKK Molugu's Playoff Quarterback TouchdownsRussell Spangler's Bacon Viz (and WAY too many more to mention).  

HOWEVER...

In our day jobs, there is much less room to be creative and more of a need to be direct.  As a result, designs usually involve displaying more numbers than visualizations.  And while there are best practices by Nelson Davis about when to use numbers and when to use visuals, numbers end up more often than us 'creative types' would prefer.  


FEAR NOT!

You can still let loose your creative side even when displaying numbers.  My personal favorite trick is the MIN(Number of Records) trick, or simply MIN(1).  You can create the field like so, and then set the default aggregation to MIN


You can create a new field or simply use 'Number of Records' that is in default Tableau
Set the default aggregation to Minimum to make ongoing use easier

And get results like this


WHAT?!


MIN(1) is a calculated field that you can create that give you a measure in your worksheet that acts as a place holder for other measures.  You can then add whatever measure, or combination of measures, to the text charm of your field and display that in a very organized fashion.

???????????

An example then.

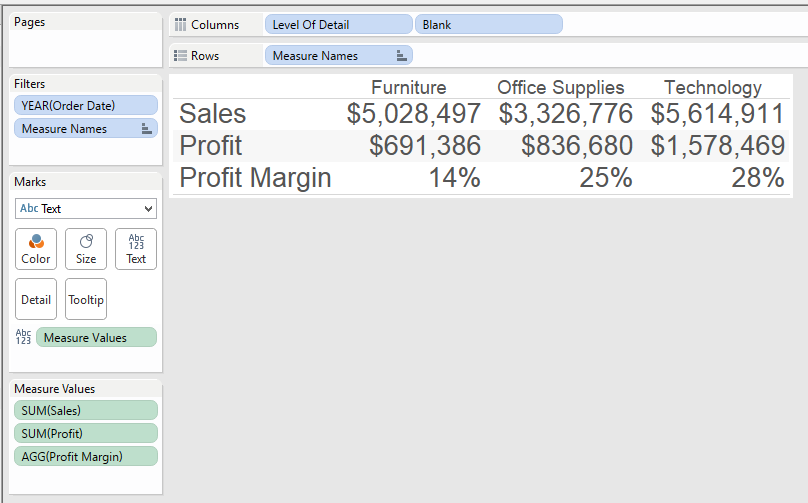
Normally, if we wanted to show a series of numbers on a sheet, we put 'Measure Names' in the rows, 'Measure Values' in the Text, and it would look something like this....

But if you want to color just the Profit Margin line, based on a set percentage of 20%, you can't.  An attempt would make your result looks something like this...

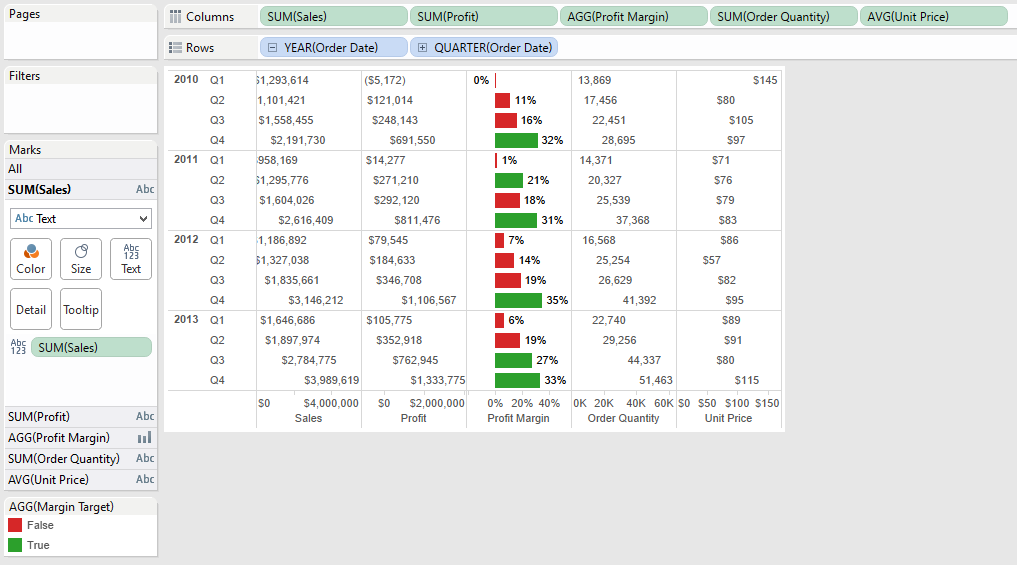
However, using MIN(1), you can set placeholders for each of the measures and then analyze them however you want.  Here's the same sheet, redesigned....


Notice how I've dragged four copies of 1 on the screen that show up as MIN(1) because that is the default aggregation I have set.  Every row is now on a scale of 0-2, with 1 dead in the middle, but more importantly it provides it's own measure to color, size, give level of detail, etc.  Now I can just color the Profit Margin line by itself and leave the other lines alone.


NOT ENOUGH, YOU SAY?!

What about combination charts, a chart that shows both bars and text.  If we try the traditional example again, we get something like this.

While we are able to achieve both text and charts, the text is aligning to the value it represents thus making it hard to read the numbers.  Now let's' rebuild this using MIN(1)

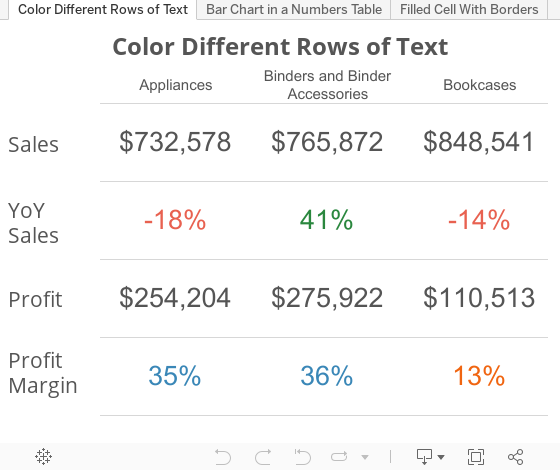
The result is that the numbers are all aligned for each metric, a bar chart is in the middle for the specific metric worth highlighting, they are still separate measures which allows us to edit color, size, and level of detail, with an overall clean look.

UPDATE:  Steven Carter wrote a post to do filled cell conditional formatting with text.  Forcing the cell lengths and using Gantt charts you can now have a look that is similar to Excel (for helping people transition away from it)
Way to go Steven!
In addition in both cases, because this is all done in 1 chart there is one query back to the data source, and if you have too many values to fit on the screen, you can SCROLL (!!!!!) and know that one scroll will move all of the fields necessary.


ONE MORE EXAMPLE

I was working with a customer where on a dashboard, we wanted a way to highlight the number of alerts that people needed to pay attention to.  To make it stand out, I put the number in a text box with a highlighted background and a border. 

Using MIN(1) as a bar chart and setting the range from 0 to 1, I can set the border on the bar chart, change the background color based on any value you want.  All of this is happening while also never having to worry about the bar chart range.  Here's what the sheet looks like.


CONCLUSION

If you're building a dashboard and need to display numbers in some capacity, MIN(1) is another tool in your Swiss Army Knife of Tableau skills.  It allows you clean layouts but with all of the customization we've come to know and love using Tableau. 

Please comment or tweet at me (@DanRMonty) with other ways you've found you can use MIN(1)!


DISCLAIMER: you do need to have text fields on your dashboard now to label your measures (you can put them in a container to make it easier to manage).  You can see this in the dashboard above.

Sunday, September 28, 2014

How to auto-scale and auto-arrange shapes/visuals in Tableau

I ran into a unique problem when I built my sports viz a while back.  I had this idea to show a picture for every value of a metric.  However, when I sized the sheet to fit the maximum allowable values, any less than the maximum showed a large amount of white space. (I've since updated the sports viz with this article's trick)  

Then my friend Steven Carter released his viz titled "The Adoption Gap" (and subsequently won Viz of the Day) where he took my picture idea to the next level with his household grid.  Using formulas, he was able to set a grid, and then show a gradually filled in house to represent the number of adoptions needed.

AND THEN Chris Luv released his viz explaining INDEX() and SIZE(), two incredibly valuable table calculations in tableau to determine size and position of a point.  Using INDEX and SIZE, he was able to completely recalculate row and column values on the fly, removing a lot of constraints Steven and I had come up with. His final viz was so good, it made me rethink my entire design.

Having been inspired by a number of sources, I present a fourth option (very close to Chris' solution but with a slight tweak). I have build a sample viz that shows how to use formulas and table calculations to autoscale and autoalign shapes (or visualizations as Chris will show) to a grid based on how many values are available. Check out the final result below.


HOW TO

In my original sports viz, I was unaware that Tableau will do the sizing and arranging work for you if you have rows and columns that the images will fit in.  So here's how to use a unique ID column to auto generate the links we need

1) Create 'Y Axis' Field

INT((INDEX()-1)/ ROUND(SQRT(SIZE())))

So what is going on here?  The idea is that as the number of objects to display is usually best represented in equal rows and columns.  Thus, the number of rows we want (represented on the Y axis) should be the square root of the objects/dimension values.  The INDEX() -1 offsets the values so they continue to line up instead of shifting out.

2)  Create 'X Axis' Field

INDEX() - (INT((INDEX()-1)/ROUND(SQRT(SIZE())))) * ROUND(SQRT(SIZE()))

This one is a bit more complicated, but is to continue to hit on the idea of displaying equal number of rows and columns.  So with the 'Y Axis' figuring out a bucket for values for the row, the X axis needs to reassign the ID for the value so that the rows start over successfully.

So what this formula is doing is taking the current index value, subtracting the y axis bucket multiplied by the bucket value to always reestablish the new set of rows.

3) Build sheet and assign shapes

The setup is as follows
a) [ID] goes in the details
b) 'X Axis' goes on the columns shelf, convert to discrete
c) 'Y Axis' goes on the rows shelf, convert to discrete
d) 'Y Axis' and 'X Axis' should be addressing every field (see second screenshot for the how to)
a), b), & c)
d)
Let me know if this is helpful or if you have any questions.  Thank you!

Wednesday, September 10, 2014

How to Embed Streaming Web Content in Tableau

Tableau is a great, if not the best, tool for building data visualizations.  But what the tool also includes is the ability to display content from the internet right in your viz!  Here is the how to for streaming that content, and I will be using my "Weird Al" viz as the template for this.

1. Build the Data Set

If you want an interactive viz that dynamically displays different web content, you first need to build a data set that shows the different components you want to stream.  In the case of "Weird Al", I wanted to stream his individual songs and albums, so I went to Wikipedia for his discography and copied it into a spreadsheet. 

  • Just like any other Viz, a content viz is still data driven, so be sure you have the most robust/cleanest data you can work with
Album data with various attributes
Song data with various attributes

2. Gather the web links

In a "How-To" guide that allowed me to even build out this idea, +Ben Jones wrote about embedding YouTube into Tableau.  The key is that regardless of your content source (YouTube, Spotify, Soundcloud, etc), you want to find the 'embed' url to leverage in your dashboard.  In Spotify, these can be found by right clicking on a song and selecting 'Copy Embed Code'
The resulting code will look something like this, and the URL that you want is highlighted in yellow: <iframe src="https://embed.spotify.com/?uri=spotify:track:4ZJGobiy4ayWSdKfoqMRlX" width="300" height="380" frameborder="0" allowtransparency="true"></iframe>

That URL can be copied to your Excel data like so
It is very important to line up the correct URL to the correct record in the data

  • Regardless of web source (YouTube, Spotify, Soundcloud, etc), identify the Embed url the desired content, and include that in your data source

3. Build a Dashboard That Will Stream the Web Content

In your viz, design your dashboard however you wish.  For the "Weird Al" viz, I wanted people to be able to select an image of the original artist and then be able to play that song.  Here is what the resulting Tableau sheet looks like
The field containing the URL needs to be in the details of the worksheet
In the dashboard, add the worksheet as well as a Web Page item.

After adding Web Page, select 'OK' to continue.  It's okay to leave it blank
With the URL is part of the details, the URL can be triggered from the dashboard via an action.
Add the sheet to a dashboard, then select Dashboard -> Action
The type of Action to add is a URL action
Check off the sheets you want the action to work from, and then select the field that contains the URL you wish to stream.
Select the arrow, then select the field that has the URL
After that, you can now stream by making a selection on the specified sheets (in this case Parody Song - Images and Parody Song - Lists) and the url listed in the data will appear in the web part.

  • After placing a Web Page part on your dashboard, you can use a URL Dashboard Action to pull the streaming content from the selected data point.

BONUS POINT. Custom Hyperlink Text

In the section above, the url action was delivered using a 'Select' URL action.  That means when a component of the specific worksheet is clicked on then the action will take place.

Tableau also offered 'Menu' actions, meaning that when you hover a specific data point, a URL link appears in the tooltip for you to select.  The advantage here is that you can variablize the text in the tool tip.  For example, the links could looks something like this...

This is easy enough to do.  Start with the URL action just like before

Select the 'Menu' action, and whatever you put in the Name will be what's displayed to the user.  You can even variablize the name by including values from the data, in this case Song title.


  • Actions can be selection or text based.  The text based actions, however, can be customized to display a message to the user relevant to the data point they are hovering on.

Conclusion: Steaming Web Content is Easy and Awesome in Tableau!
So there you have it, a breakdown of the how to embed steaming web content in your Tableau dashboard.  Check out the original viz for the interactive experience.


Making a Viz That Stops Traffic

I was honored to be asked to speak at +Tableau Software's Customer Conference this year with the extremely talented +Anya A'Hearn and +Paul Banoub at a feature presentation entitled "Making a Viz That Stops Traffic" hosted by the ever amazing +Jewel Loree.  I gave the following presentation, which compiles my thoughts and process for how I approach building dashboards and visualizations.

Enjoy and feel free to comment to let me know your thoughts.  Thank you.

Thursday, July 31, 2014

Weird Al FTW

My enthusiasm for "Weird Al" started back in 1996 when I was at a friends house and he played the "Bad Hair Day" album for me.  I didn't know any of the regular songs, but I thought everything he did was super funny and also made me dance around the house.  As time went on, I was able to see him live twice (a must do for anyone) and somehow at every stage of life, I've found other people who enjoy listening to Al as well.  

To celebrate his latest album, "Mandatory Fun" and it's climb to #1 on the Billboard charts, I have created  a viz to show off how much Al has accomplished and give the user a way to interact with his music like never before.  

Hope you enjoy!


Thursday, April 24, 2014

Tableau Data Blending with No Common Dimensions

Sometimes when you're working with data, there is a need to compare datasets that don't really have anything in common.  This issue came up with my Sports Viz Show Me The Money: I had a dataset that contained the top 100 earning athletes in 2013 and I wanted to show what their pay could buy for them at an individual item level with out creating an unnecessary Cartesian product..  
Athlete data: a single row per athlete
As Gru would say: Light bulb!  If I create a data set containing a row for each purchasable item repeated the maximum amount of times it would appear (aka the number of times the top earning athlete, in this case Tiger Woods, would be able to purchase it), then I could write a calculated field that blended the two sources and did my filtering for me.

Stuff to buy data: note there is no column mentioning athlete
Doing this gave me two data sets: one that was 100 rows deep and the other just over 5,000 rows deep.

Next, after bringing in both data sets into Tableau, I created a cross dataset calculated field on the 'Stuff to Purchase' dataset that would allow me to filter out when the number of items exceeded the athletes pay.
running_sum(sum([Cost]))<=sum([Forbes 100 Athletes].[Pay $])
This way when I add the purchase able items at a data level, it will continue to referenced the accumulated value of the purchases and restrict them to only total that is less than the salary of the specified athlete.

Finally, I added
- RowID into the details
- 'How Many' true false filter to the filter section
    - IMPORTANT: Change the 'Compute Using' to use RowID
- Add the purchase category and item to the filter section
- Added the object's description to shape
- Filtered it for the specified athlete (from the secondary source).
   - This ultimately ended up being a quick filter that allowed me to select different athletes

Now I had my sheet that showed each of the items that the person could buy.
 If I had joined them ahead of time, I would have had a Cartesian product of over 160,000 rows!  This not only saved me data space, but also cut down on the data prep I needed to get dashboard built.  

So the answer all along (to the question that was never asked) was yes, it will blend...even if there are no common dimensions.  Let me know if you have any other questions and feel free to comment.  Thank you!

Wednesday, March 19, 2014

Ready, Set, #IronViz

March is Sports Blogging Month at +Tableau Software.  If you have ever visited my blog before, you know that's definitely the kind of blogging I can get behind (all but 2 of my vizzes have related to sports).

So here is my official submission for the sports blogging month and #IronViz sports blogging challenge.  Forbes publishes a list of the top 100 earning athletes and in addition to finding insight into HOW these athletes earn their money (endorsements vs salary/winnings), I tried to put a picture around what exactly $78 million dollars translates to (answer: a lot!). 

So enjoy and feel free to comment or let me know if you have any questions.  Thanks!